Learning Inkscape - An Order of the Stick Avatar Guide
Out on a limb
It's time to put some limbs on this guy!
For the moment, all we're going to do is draw the basic outline of the arms and legs.
We won't worry about the hands or the feet yet.
 The tool we'll be using for this is the pen tool, shortcut key Shift+F6.
The pen tool can draw lines and curves, all joined together to make what Inkscape calls a path.
It's a bit tricky to get used to; I tend to make the curves bend the wrong way on the first go.
But it's pretty easy to correct the curves as we'll see.
The tool we'll be using for this is the pen tool, shortcut key Shift+F6.
The pen tool can draw lines and curves, all joined together to make what Inkscape calls a path.
It's a bit tricky to get used to; I tend to make the curves bend the wrong way on the first go.
But it's pretty easy to correct the curves as we'll see.
The arms
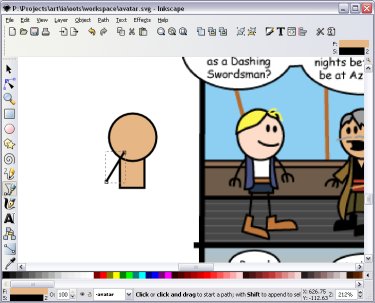
Pick a zoom level that you can see our shapes and one of the reference characters.
You might also need to move both shapes to be closer to the comic.
You can move both at once by choosing the selection tool and dragging a box around both.
To start with, we will draw straight lines for each of the arms (we'll turn them into curves later).
With the pen tool, click once where you think the arm on the left starts, and click once where it ends.
Don't worry too much about getting it right - we can fix it later.
Once you do this, the tool should show a green line where you drew and be waiting for you to make a second line attached to the first.
Right click and it will stop and give you a single straight line.
 Now we'll make some small adjustments to this line with the node tool (shortcut key F2).
The node tool is probably the most important tool to practice with,
as it's the one that lets you fine-tune the shapes to look exactly the way you want them to.
It's the tool that lets you play with the building blocks that all the lines and curves in Inkscape are made with.
Now we'll make some small adjustments to this line with the node tool (shortcut key F2).
The node tool is probably the most important tool to practice with,
as it's the one that lets you fine-tune the shapes to look exactly the way you want them to.
It's the tool that lets you play with the building blocks that all the lines and curves in Inkscape are made with.
Choose the node tool and select the arm line you just drew.
You should see two little grey diamonds at the ends of the line.
These are the nodes - they tell Inkscape where the line starts and ends.
You can change where the line starts or ends by dragging the nodes around.
Hold the mouse over one of the nodes until it turns red.
Then click and drag to move the node to whereever you wish.
You can also turn the straight line into a curve by clicking the line itself (without a node turning red) and dragging.
If you do so on this line, you might notice that it has a fill colour - which isn't what we want!
Not what we want in an arm...
We need to remove the fill in this arm line so it only has a stroke.
First select the line, then click the middle mouse button over the skin coloured fill at the bottom left corner of the screen
to remove the fill.
Alternatively, you can go to the Fill and Stroke window (Shift+Control+F) and select the X icon for "No Paint" in the Fill tab.
Much better!
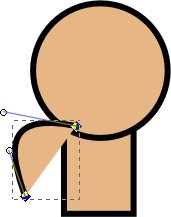
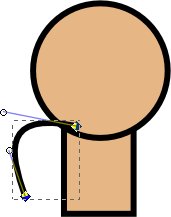
See those little lines and circles sticking out of the nodes in our curve?
These are called node handles, and indicate how much the line is curving.
Straight lines don't need these, as Inkscape just needs to "connect the dots" between the nodes directly.
But with curves, Inkscape needs to know what direction the line should leave the node
and how far it should go before heading towards the other node.
You can drag around the node handles to change the curve, or you can click a point on the curve and drag it around to bend it at that point.
Play around with dragging handles and the curve to get a feel for what they do.
When you're done, get the line looking like an arm again by choosing a decent looking curve.
While we're playing with this arm, we might as well make it look a bit like an OotS arm:
- Arms tend not to stick out in front of the body. So select the curve and press End to send it to the back of the ordering.
- Arms also tend to spring out from the join of the head to the body;
so with the node tool, drag the node of the arm that's behind the body to roughly the point where the head and the body meet.
It's better to have the node a little bit inside the body than outside so you can't see the join.
You might need to zoom in get the node in the right place.
We'll be moving things around a lot later on, so we'll have to go back at the end to clean things up,
but it doesn't hurt to make our avatar in the making look respectable.
We're done with this arm for now, so go ahead and make the other arm.
It's exactly the same process.
When you're done, you should have two curves that look a little bit like this:
Don't worry if the arms look a little uneven or aren't the positions you'd like them to be in finally.
We'll be posing the avatar later on.
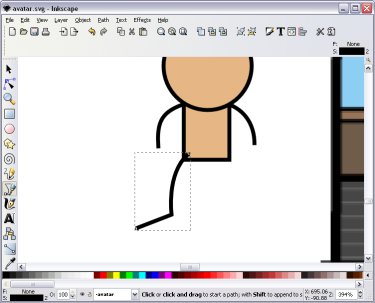
The legs
Basic Order of the Stick legs look a bit like the capital letter L.
We'll need to create a path (connected lines and curves) using the pen tool to make our leg.
I'll start with the leg on our left (the avatar's right).
Select the pen tool from the menu on the left (or Shift+F6) and find a point where a leg would start;
just inside the body at the base a little bit in from the left.
Have a look at a few of the characters in the comics to get a feel for what the legs should look like.
This time we're going to try and draw a curve directly with the pen tool.
This is tricky, so it's probably not going to look right first go.
To draw a curve with the pen tool,
click on the starting point and drag in the direction that you want the curve to go.
When you let go of the mouse, you can then click without dragging to place the next node
(don't right click after this - we're wanting to draw another node straight away).
Don't be too worried if it looks a bit of a mess; I haven't fully got the hang of the pen tool either.
I just wanted to show you what can be done.
With a combination of clicking, holding and dragging you can create very complex curves with the pen tool
once you have mastered it.
Once we've drawn one curve the pen tool should still be active waiting for us to draw another node.
This time we'll just draw a straight line for the foot, so don't drag and click to place the find end point.
Then right click to finish the leg.
You'll end up with something that looks a bit like this:
You might want to move around the leg nodes, so select the node tool and click on the leg path.
You'll see that the leg has three nodes; one on each of the ends and one to define the join between the end of the leg and the foot.
Every time we want a path to change direction we need a node to define it.
You should also notice when you click on the line again that only the curved part should have node handles.
The foot should be a straight line.
If you want to change the foot into a curve, you can easily do so by dragging the line out into a curve like before.
If you want to change it back into a straight line, or change the leg, there's a button to do so in the node toolbar at the top of the screen.
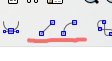 These two buttons can change a line segment - the line between two nodes - into straight lines or curves.
Changing a straight line into a curve won't change the line segment itself but will add node handles.
Changing a curve to a line will change the line segment to go straight between the two nodes.
Select a line segment by clicking on it (the nodes around it should change to yellow) and click on a button to make the change.
These two buttons can change a line segment - the line between two nodes - into straight lines or curves.
Changing a straight line into a curve won't change the line segment itself but will add node handles.
Changing a curve to a line will change the line segment to go straight between the two nodes.
Select a line segment by clicking on it (the nodes around it should change to yellow) and click on a button to make the change.
For now, I'll move my leg back into a neutral position by changing both the leg and the foot into straight line segments,
and moving the nodes back into a neutral standing pose.
I'll also move it back behind the body using the reordering shortcut keys.
Once you're done with this leg, try drawing the other leg and getting in the right position.
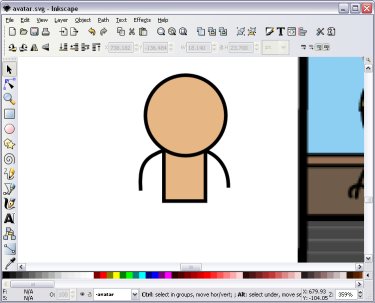
After you're done with the arms and legs, you should end up with a figure that looks a bit like this:
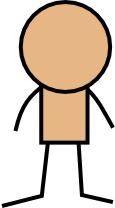
I went back and slightly changed the curves of the arms with the node tool
because there were a bit bowed for my tastes.
Make some tweaks if you're unhappy, but don't go overboard; we'll be changing things round once we start adding detail.
But I find it helps if the figure looks roughly right as we're working on the avatar.
Now our little guy is starting to look like a proper character!
He still needs some key features to look like he's part of the OotS world, though.
The basic stuff he still needs are hands, mouth and eyes.
I'll show you how to add those in now so our basic version of the avatar is complete.
Save your work first though!