Learning Inkscape - An Order of the Stick Avatar Guide
A trip to the hairdresser
Now the clothes are out of the way, it's time to put in hair and details around the face.
The process for creating hair is similar can be similar as for the clothes.
However occasionally some hair styles require a bit more roughness than for most clothing styles.
For this, it might be a good idea to use a different tool which I have not covered yet:
the pencil tool
 The pencil tool (shortcut key F6) is used to create freehand lines, and works similar to that as a pencil in raster editing programs
like Paint.NET, Photoshop and the GIMP.
You can click where you want to start drawing and move the mouse in the shape you want.
The tool will keep creating nodes to follow the path you make with your mouse.
Like with the pen tool, you can make a closed shape with the pencil tool if you finish at the same point where you start;
however it's easy to miss this point and end up with an unjoined path.
This tool is especially great if you have a graphing tablet.
The main downside of the pencil tool is that it creates a lot of nodes, which makes it harder to clean up with the node tool.
The pencil tool (shortcut key F6) is used to create freehand lines, and works similar to that as a pencil in raster editing programs
like Paint.NET, Photoshop and the GIMP.
You can click where you want to start drawing and move the mouse in the shape you want.
The tool will keep creating nodes to follow the path you make with your mouse.
Like with the pen tool, you can make a closed shape with the pencil tool if you finish at the same point where you start;
however it's easy to miss this point and end up with an unjoined path.
This tool is especially great if you have a graphing tablet.
The main downside of the pencil tool is that it creates a lot of nodes, which makes it harder to clean up with the node tool.
To show the pencil tool in action, I'll give the avatar a slightly unkempt hairstyle.
While I work on the head I'll separate it away from the rest of the body so as not to complicate things
with the clothes.
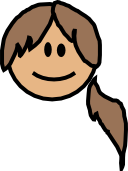
Here's the head after I drew three shapes with the mouse and coloured them in brown.
As you can see they're a little rough around the edges.
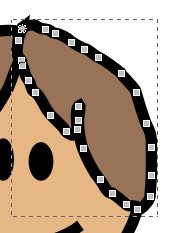
If you take a closer look at the nodes in one of these shapes, you'll there's a lot of nodes within such a small shape.
This piece of the hair has 29 nodes, while the female body shape we made earlier only has 8.
While the hair doesn't look that bad when you zoom out to normal size, I'd like to clean things up to make them smoother.
A nice first step is to use Simplify, available under the Path menu (Path > Simplify); shortcut key is Control+L.
Simplify will remove some of jaggy edges in paths and usually reduces the number of nodes.
Repeated use of simplify can make things look a bit more rounded, but eventually you'll lose the original shape.

Here's the hair after I've used simplify three times. The hair looks a bit smoother, and the number of nodes has gone down to 9 in each piece.
It's still not quite right for my tastes, so I'll open up the node tool and fix things up manually.
I'll add in corner nodes at each point I want the hair to make a sharp point, put in smooth nodes to define the general shape of the hair and delete any extra.
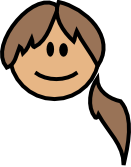
It still needs some clean up, but it's now ready for the next step: a bandanda.
The main part of the bandana should follow the shape of the head, so I'll make a copy of the head and paste it in place.
I'll create two nodes where I want to cut the bandana; turn all the nodes into corner nodes and then delete all the ones I don't need
(holding Control as I do so - that means Inkscape won't try to make the curve try and fit the deleted nodes).
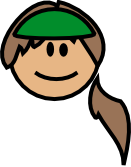
Now I've got the right shape, I'll stretch it to cover the hair and clean up the curves.
As I do so, I'll make any adjustments to the nodes in the hair to make it fit in with the bandana.

Now I'll make the tie to go at the back. These are simply three small ovals, converted to paths and adjusted a bit to look right.
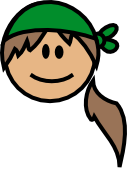
Last, she needs something to constrain her pony-tail, so I'll give her a bead like Haley.

This will do for now; I might like to give her a different expression, but that can wait until
we get around to choosing a pose for her.
The only thing to do now is to put the head back on her shoulders, seeing how the colours blend together,
and how the composition of the new head looks with the body:
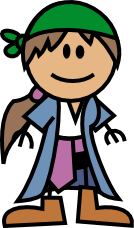
After seeing how the original head looked on the body, I changed the pony-tail and bandana around to the other side.
Because her body shape curves on the right side which in a more realistic art style would curve in front,
it makes sense to put the hair items that would naturally be at the back on the other side.
It also gives the character a bit more balance.
I tried playing around with other colours for the bandana, but I like the way the green contrasts with the blues and purples.
I think I'll keep it green.