| Giving your character props | Index |
Once you've got an avatar you're happy with, you're going to want to get it in a form that you can use. Inkscape works with Scalable Vector Graphics files (SVG), but not many applications can read them. For example, only a handful of web browsers can display SVG files correctly. For most tasks, you're going to have to convert your SVG file to a raster format.
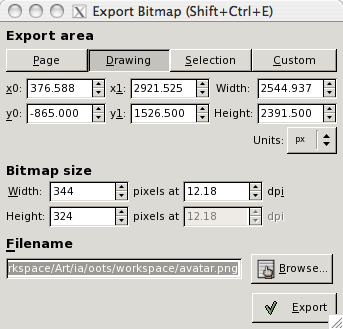
Inkscape has the capability of exporting bitmaps from your vector image to Portable Network Graphics format, or PNG. This handy function is under the File menu (File > Export Bitmap), or by using the shortcut key combo Shift + Control + E.
Note: Since the last tutorial, I've switched to using an iMac instead of a Windows XP PC. There may be some change to the screenshots because of this, but the interface between the two should be similar.
Here you've got a number of options in choosing the image you want to output. The buttons at the top choose between four different areas in your image for your selection:
I usually like to keep draft scribbles on the sides of my screen, so outputting the whole drawing usually isn't that useful to me. Outputting the page is useful if you're sticking to a fixed dimension, such as if you were making a comic strip. You can set the size of your page under Document Properties (in the File menu). However for avatars, the most useful is choosing selection.
Sometimes it's difficult to select everything that you wish to export, such as if you only want to have part of an object. A useful trick for exporting a selection in these situations (or even just generally) is to make a special rectangle just for defining the region you wish to output. I sometimes like to define a layer which is made purely to hold these rectangles. The steps for this process are fairly simple:

Once you've exported your avatar, you'll probably want to do something with it, like putting it up on the Internet. However you wish to convert it to a different format; maybe you need a special format for the website you are using, or maybe you wish to save space. You'll need to choose the best file format for what you need.
Unfortunately for those of you who like choice, Inkscape can only output to PNG files. If you want to use a different file format you'll need another application to convert. I typically use another editor for conversions. The GIMP is a good editor for this, or you can use any other editor like Photoshop if you have it. As long as it can open PNG files and save to your desired format it will be fine. Just open the image and save it as the file format you want. Easy.
If you are unsure as to which file format to use for the Internet, there are two that the most useful for non-animated images, PNG and JPEG.
PNG is what Inkscape exports to, and it is extremely good for cartoon images with large areas of flat colour. Order of the Stick cartoons are idea to be saved in PNG. It has the benefit of being lossless; that is, you won't lose any quality by converting to PNG.
JPEG is another useful format that is better for photorealistc images or those with lots of gradient effects. It is a lossy format, so you will lose some image quality in conversion, but richly detailed images like photos will be smaller. If you are to convert to JPEG, make sure it is the last step in any formatting you use to avoid repeatingly losing detail. Use a lossless format like PNG as you are working.
There are other formats out there that you might consider but usually aren't as good as PNG or JPEG for web images.
GIF is a format which is also good for cartoon images, but has been superceded by PNG. GIF cannot contain as many colours as PNG can, and is usually larger than PNG. Its main advantage is that it can contain animations, which PNG cannot. It is also slightly better supported in old browsers, but these days it is very rare to find a browser that doesn't support PNG.
Avoid using formats like Windows BMP for final images. BMP does not have any compression,so the file sizes are large. BMP is fine for temporary images while you are still editing (although PNG is just as good), but posting a BMP file on an internet site will make your viewers angry that you are sucking up their bandwidth needlessly.
If you are using PNG files, there is a very handy application called pngcrush (Wikipedia link) that will help you reduce file sizes. This neat little app improves the compression in your PNG files and strips out any needless data that editors often leave in. You can often halve the size of your file with no loss of image quality.
Plain vanilla pngcrush is a command line utility, so you'll need to run it from a DOS box or a terminal window. However there are a number of version that wrap pngcrush in a small application to make it easier for you. I am using one called PNGCrusher for Mac OS X at the moment, but there are others available for Windows. Look at the links on the Wikipedia entry for more or Google for pngcrush to look for them.
| Back to the Index | Back to Top | Order of the Stick is Copyright © Rich Burlew 2003 - 2008 Last updated: 5th February, 2008 by David Shaw |